How to fix Product Information Not Valid


You will need to unlock the MPM, run Wndmifit64.exe, and then relock the MPM. To unlock the MPM, copy the FSMC.bin file from the WNDMIFIT folder to a Fat32-formatted USB drive. Rename the file to SMC.bin. Plug the USB drive into the laptop with the power off. Hold Windows Key + Arrow UP Key + Arrow Down Key at the same time and power the system on. Release all keys when you see the blue HP logo. You should see a brief message on a white screen saying that the SMC command was handled successfully. This means that the MPM is unlocked, and will remain so for the next 10 power-cycles.
- Now you need to reset the missing information in the BIOS. To do this, boot back into your Windows MBR harddrive and run Wndmifit64.exe which is located in the WNDMIFIT folder of the NbDmiFit-2.10.zip package. You should see the Notebook DMI Firmware Interface Tool appear on the screen.
-
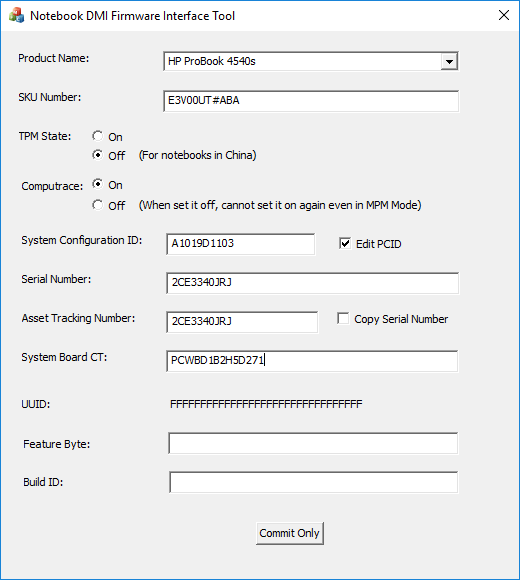
Fill the blanks in with the information that you gathered in Step 3. I would recommend verifying that you have correctly read the Serial Number by performing a search for it on the HP Support site. Note that your laptop may not have numbers for all of these fields, I believe the last two fields are only for laptops manufactured since 2015. Click “Commit Only,” “OK,” and “OK.”


- The last step is to lock the MPM back up. If you reboot now, you will lose everything that you accomplished in Step 7. Run lockmpm.bat, which is also located in the WNDMIFIT folder.
- Finally, reboot the system and enter into the BIOS to verify that the System Information has been up restored and restore all of your BIOS settings, including UEFI Native. Remove your Windows MBR harddrive and make all is it previously was. My generated UUID did not match the pre-error UUID, but that doesn’t seem to matter. System Information prior to error:
-

System information after error was fixed with Wndmifit64:
